


♥ Follow Me ♥

♥Free Fonts♥


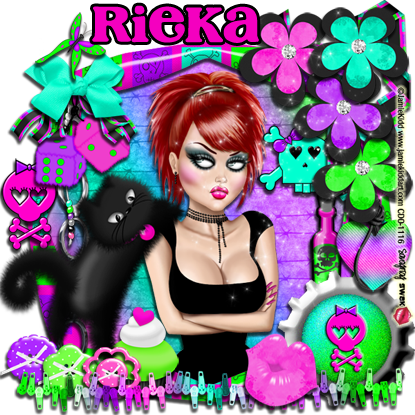
SUPPLIES NEEDED
TUBE OF CHOICE: I used the fabulous art of Jamie Kidd.
You must purchase a license to use her art.
You can find Jamie's art and get your license HERE.
SCRAPKIT: Sweet Punky by Rieka Rafita.
This is a PTU kit. You can find it HERE.
FONT OF CHOICE: I used Cafe Rojo.
I used Photoshop for this tut.
♥♥♥♥♥♥♥
Let's have some fun!
Open a canvas, transparent background, 650x650 pixels.
Open RR_Paper12.
Open your tube and place in the center of canvas.
Open RR_Frames4, center.
Grab your magic wand and click inside the Frames4.
Highlight Paper12 layer.
Go to Select in your tool bar.
Click Inverse.
Hit the Delete key on your keyboard.
Go back to Select.
Click Deselect.
Your paper will only show inside the frame.
Now for the fun!
Let's go nuts...
I used the following elements:
RR_Poison
RR_Skull3
RR_Skull2
RR_Ribbon1
RR_Bottlecap
RR_LoveRope
RR_Flower1
RR_Flower2
RR_Flower3
RR_Flower4
RR_Chain
RR_BeadedString
RR_Dice
RR_Cupcakes
RR_Cats
RR_Button1
RR_Button2
RR_Button3
RR_ZipperedBorder
RR_Lips
RR_Bow1
RR_Bow2
RR_Butterfly
RR_Sparkle2
I flipped the Lips horizontally.
Place a drop shadow on all the layers.
Make a new layer on top of all layers.
Type the name you want in the font you want.
I used the eye dropper tool and chose the color of the kitty's collar tag.
I also used Stroke, outside, 5, black.
MOST IMPORTANT!!
You must now do this:
Put the artist's name, website, and your license number
of the tube you used on the siggy!!
Add your name (ie: Designed by Your Name) behind this info.
Make sure this info is legible and clearly seen.
Save as PNG.
YOU'RE DONE!!
I hope you had fun with this tut!
HUGS!
*This tut was created by me, Redneck Tuts by Savage.
Any resemblance to any other is purely coincidental.*
Artist: ©Jamie Kidd www.jamiekiddart.com CDO-1116

SUPPLIES NEEDED
TUBE OF CHOICE: I used the fabulous artwork of Elias Chatzoudis.
The tube I used came with a close up.
You must obtain a license to use his art.
You can find Elias's art and get your license HERE.
SCRAPKIT: Bad Girls by Designs by Ali.
This is a PTU kit. You can find it HERE.
FONT OF CHOICE:
I used Splendid ES.
I used Photoshop for this tut.
♥♥♥♥♥♥♥
We'll be playing with Noise and Blending Options.
If you don't want to animate
Skip the parts marked **BLUE**.
Let's have some fun!
Open a canvas, white background, 650x650 pixels.
Your background can be transparent if you are not animating.
Open Paper5.
Center on canvas.
Set the Opacity to 50% in your layer palette.
Open ChainFencing2.
Center on canvas.
Open Boarder3.
Resize to 45%.
Center and place this at the top of your siggy.
Duplicate this layer.
Place the dup at the bottom of your taggie.
You have just built your frame.
Open your tube.
Place her where you want her.
(We'll use the close up in a bit.)
**With this layer highlighted,
Grab the magic wand to the left of the screen.
Holding the Shift button down on your keyboard,
Randomly click on the gray areas of the boa.
(If you accidentally click on the black,
just go to Edit in your toolbar and click Step Backward.
Then press the Shift key again, hold down,
and continue clicking the gray areas with your magic wand.)
When you're happy with this
Go to Edit and click Copy.
Go to Edit again and click Paste.
You'll now see a new layer in the layer palette.
Name this layer boa1.
Duplicate boa1 twice.
Highlight the first boa1 layer.
Go to Filter in your toolbar.
When the drop down menu appears
click Noise, Add Noise.
In this window, do the following:
Check Uniform, uncheck Monochromatic
First layer of boa1: Noise 20
Second layer of boa1: Noise 25
Third layer: Noise 30**
Now for the elements!
Behind your tube and Boarder3, I placed these elements:
Drape3, centered resize to 50%.
Cage, over to the lower left a bit.
Tag2, resize 50%
Place it so it frames your tube's head.
Badge1, resize 30%
Rotate slightly and place next to Tag2.
Open KissLips2.
Use my siggie as a guide for placement.
Open your close up tube.
Position her inside KissLips2.
Highlight the KissLips2 layer.
Grab your magic wand over there to the left.
Hold the Shift key down on your keyboard.
Start clicking the inside of the lips.
Do not click the open part in the center.
Do this until all of the KissLips2 has marching ants around it.
Now highlight your close up tube layer.
Go up in your tool bar and click Select.
In the drop down menu,
Click Inverse.
Hit the Delete key on your keyboard.
Go back and click Select again.
In the drop down menu,
Click Deselect.
You will now see your close up tube inside the lips
with nothing hanging outside.
Keep your close up tube layer highlighted.
Right click this layer in the layer palette.
A window will pop up.
Look for Blending Options.
Click that.
These are the settings I used:
Blending Options: Screen 40%
Fill Opacity: 100%
Channels: check R, G, B
Knockout: None
Check:Blend Clipped Layers as Group
and Transparency Shapes Layer.
Blend If: Gray
This Layer: 0, 255
Underlying Layer: 0, 255
Click OK.
Your close up tube now blends into the lips.
Now for the rest of the elements:
Place these wherever you want.
Bow2, resize 20%
Gun1, resize 25%:
Duplicate, flip horizontally, placed in upper corners.
Bow3, resize 20%
Duplicate two times.
Place one on each gun and one on cage.
For the lower part of my tag
I used these elements:
Brad2, resize 65%
Corset1, resize 35%
Boots2, resize 30%, duplicate.
Padlock1, resize 25%
NeckChoker2, resize 15%
I erased a little bit of this so the key of the padlock shows.
NaughtyBook1, resize 35%
HandCuffs1, resize 25%
Flower4, resize 15%
Flower1, resize 15%
I placed a drop shadow on everything
except:
Boader3 (both layers)
ChainFencing2
Paper5
Close up tube
Now go grab a random eraser.
Hightlight Paper5 layer.
Randomly erase around the edges.
Make a new layer on top of all layers.
Type your name.
Position it where you like.
You can use the eyedopper tool to select a color.
I clicked inside Tag2 for the color, fcdefd.
With your name layer highlighted,
Go to Layers in your toolbar.
Drop down menu:
Click Bevel & Emboss.
These are the settings I used:
Style: Inner Bevel
Technique: Smooth
Depth: 100%
Direction: Up
Size: 5
Soften: 0
Angle: 74%
Check Use Global Light
Altitude: 30%
Highlight Mode: Screen, 75%, white
Shadow Mode: Mutiply, 75%, black.
**Duplicate your name two times.
Right click your first name layer.
Click Rasterize Type in the new window that pops up.
Do this for the next two name layers.
Highlight your first name layer.
Go to Filter in your toolbar.
When the drop down menu appears
Check Uniform and Monochromatic.
First name layer: Noise 30
Second name layer: Noise 35
Third name layer: Noise 40**
Still with the first name layer highlighted,
Go to Layers in the toolbar.
Click on Stroke.
I used:
Outside, 2
color: d920d2
Blending Mode: Normal
Opacity: 100%
Click OK.
Go back to Layers in the toolbar.
Click Outerglow.
Blend Mode: Screen
Opacity: 75%
Technique: Precise
Spread: 0
Size: 5
Range: 50%
Jitter: 0
**With this layer still highlighted,
Right click and click on Copy Layer Style.
Highlight the second name layer.
Right click.
Click Paste Layer Style.
Do this again for your third name layer.**
MOST IMPORTANT!!
You must now do this:
Put the artist's name, website, and your license number
of the tube you used on the siggy!!
Add your name (ie: Designed by Your Name) behind this info.
Make sure this info is legible and clearly seen.
If you are not animating
Save like this:
To maintain the layers individually Save As PSD first.
Then rename the sig adding a number or letter
and save as PNG.
YOU'RE DONE!!
**FOR ANIMATION**
Go to Windows in the toolbar.
Click Animation.
Set the time in the amination frame for .1.
You will need four frames.
Show all layers of your sig in each frame
EXCEPT:
For your boa1 and name layers, do this:
In the first frame:
Show only the first layers of boa1 and name.
Second frame: Show only second layers of both.
Third frame: Only show third layers of both.
Fourth layer: Show only second layers of both.
Hit the Play button and view your animation.
If you like it, you're done!
Save as PSD.
Then under File,
Hit Save for Web and Devices.
That's it!
You're done!
I hope you had fun with this tut!
HUGS!
*This tut was created by me, Redneck Tuts by Savage.
Any resemblance to any other is purely coincidental.*
Artist: ©Elias Chatzoudis www.elias-designs.gr PTE0041
About Me

- Savage
- Hi Ya'll! I'm Savage and I'd like to welcome you to Redneck Tuts. These are not your ordinary tuts, as they are geared toward those of us that don't have "working knowledge" of Photoshop or PSP. My tuts are all done in PS. They are designed to show you different techniques that you may not know. I hope you learn something that you can use in your creations in the future. Please, just have fun and put your own spin on these tuts. Be original and shine! Love Ya! ♥


