


♥ Follow Me ♥

♥Free Fonts♥


Tuesday, May 31, 2011

This Award came from
Shasta Marie from Designz by ShastaMarie
passed this award onto me.
passed this award onto me.
This award is to acknowledge blogz that rock.
If you know a blog that rocks and want to give them this award
then send them a message saying... "Your Blog Rocks"
Since I have accepted this award from TBG I must pass it onto
5 other people that I think their blogz rock.
There are no rules to this award
only that you send it to 5 people that you think deserve this award.
Make sure you leave them a message.
The 5 blogz I picked are listed below.....
Gratz on winning an award Gurlz!!!
Monday, May 30, 2011

Look what Sophia made for me!
She used my Beautiful Bitch template.
I just LOVE it!
THANK YOU SOPHIA FOR MY KICK ASS TAG!
If you'd like to check out Sophia's designs and her freebies
Visit her blog Royal Designs by Coolfunlife.
Just click HERE.
♥THANK YOU!♥


I had alot of fun with this template.
Hope you have as much fun playing with it!
You can download it HERE.
Sunday, May 29, 2011

SUPPLIES NEEDED
TUBE OF CHOICE: I used the awesome artwork of Keith Garvey.
I used two different tubes, one a Close Up.
You must have a license to use this art.
You can find his art and get your license HERE.
SCRAPKIT: Be a Star Collab by Rieka Rafita & Roo.
This is a PTU kit. You can find it HERE.
FONT OF CHOICE: I used Star Hound.
I used Photoshop for this tut.
♥♥♥♥♥♥♥
Let's have some fun!
Open a canvas, transparent background, 700x700 pixels.
Open element, e23.
Reduce size to 80%.
Place a little off center to the left on the canvas.
Open your tube (not the close up).
Place this behind the piano keys.
Open e62.
Place the disco ball behind your tube.
Open e94.
This star layer goes on top of e62
and behind your tube.
Open e29.
Place the records at the bottom of your canvas
behind the piano keys.
Use my tag as a guide.
Open e25.
Resize to 75%.
Place on top records.
On top of e23
I placed these elements:
e06
e98, resize to 40%
e67, resize to 40%, flip Horizontally
e80, resize to80%
e12, resize to 40%
e17
e22
Now open your close up tube.
My close up tube was already transparent.
If yours is not,
just play with the Opacity setting
located in the upper right corner
of your layer palette.
You may want to try Opacity at 50 -75%.
Erase any excess tube below the Be a Star banner.
Duplicate your close up layer.
Place a drop shadow on everything
except your close up tube
and e25.
Resize your siggy to your liking.
Make a new layer on top of all layers.
Type the name you want in the font you want.
I added Bevel and Emboss
with these settings...
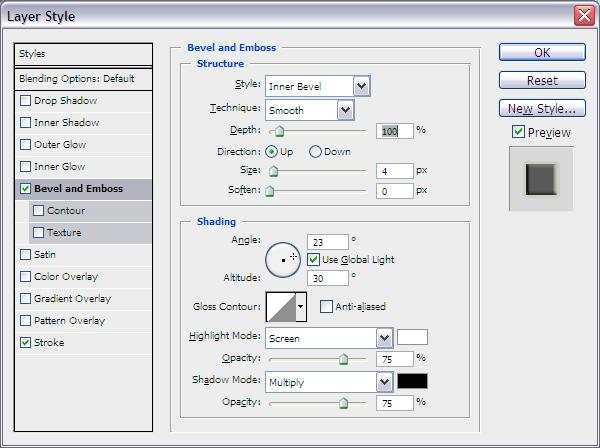
Click Ok.
Next I added Stroke.
Outside, 3, color: cfcfc0
MOST IMPORTANT!!
You must now do this:
Put the artist's name, website, and your license number
of the tube you used on the siggy!!
Add your name (ie: Designed by Your Name) behind this info.
Make sure this info is legible and clearly seen.
Save as PSD to maintain layers.
Then save as PNG, remembering to use a number behind your sig title.
YOU'RE DONE!!
I hope you had fun with this tut!
HUGS!
*This tut was created by me, Redneck Tuts by Savage.
Any resemblance to any other is purely coincidental.*
Artist: ©Keith Garvey www.garvgraphx.com PTE0041

SUPPLIES NEEDED
TUBE OF CHOICE: I used the awesome artwork of Verymany.
You must have a license to use this art.
You can find Verymany's art and get your license HERE.
SCRAPKIT: Pretty Rock Girl by Pimp'd Designz.
You can find it HERE.
FONT OF CHOICE: I used Edwardian Script ITC
I used Photoshop for this tut.
♥♥♥♥♥♥♥
We're gonna play with a mask.
Don't worry.
It's easy!
Let's have some fun!
Open a new canvas, 600x600, transparent background.
Open pd-mask.
Center on canvas.
Open pd-pp-09.
Place below mask.
Highlight your mask layer.
Press the CTRL key on your keyboard.
While holding that key down
Click the mask icon in the layer palette.
(Not the “eye”, you want to click the actual
icon that is a picture of your mask.)
You should see 'marching ants.'
Now highlight your paper layer.
Click the mask button at the bottom of your layer palette.
(This is a square with a circle inside it.)
Mask your mask layer invisible.
Viola!
Now open pd-frame-06.
Place this behind your new mask.
Open pd-wire.
Resize to 90%.
Center on mask layer.
Open pd-frame-02.
Resize to 75%
Rotate to your liking.
You can use my tag as a guide.
Open your tube.
Duplicate it and hide one layer.
(You will use this layer later.)
Position your tube inside frame-02.
Erase your tube where covers the frame
except for the skirt.
So you would erase the top half of your tube
and the legs that cover the frame.
Open ps-keys.
Resize to 80%.
Position this how you like.
Again, you can use my tag as a guide.
Open ps-music-notes.
Center so it lines up with frame-06.
Open pd-frame-01.
Center at bottom of canvas.
We are going to work inside this frame now.
Open pd-city.
Resize to 30%.
Duplicate this layer.
Flip Horizontally.
Position both these layers
in the two center squares of the frame.
It's ok it they overlap.
We'll fix that now.
Highlight the frame layer.
Grab your magic wand.
Click inside the left center square of the frame.
Highlight the city that is in that square.
Go up to your toolbar.
Click Select.
Now click Inverse.
Hit the Delete key on your keyboard.
Go back to Select.
Click Deselect.
Highlight your frame layer again.
Grab your magic wand.
Click inside the right center square of the frame.
Highlight the city that is in that square.
Go up to your toolbar.
Click Select.
Now click Inverse.
Hit the Delete key on your keyboard.
Go back to Select.
Click Deselect.
Unhide your second tube layer.
Duplicate this.
Hide one of these layers.
We'll use it later.
Place your tube behind frame-01.
Position your tube's face
to show in the left corner of the frame.
Highlight frame-01 layer.
Grab the magic wand.
Click inside the left square.
Highlight the tube layer that shows in that square.
Go to Select.
Click Inverse.
Hit the Delete key on your keyboard.
Go back to Select.
Click Deselect.
Duplicate the tube layer you just worked with.
Flip it Horizontally.
Place it in the right corner of frame-01.
We're done working on the inside of this frame.
Open pd-barbwire.
Resize to 85%.
Center on the top of frame-01.
Open pd-border-01.
Resize to 60%.
Center this at the bottom of frame-01.
Open your hidden tube layer.
Place this behind everything inside frame-01.
Flip Horizontally.
Position where you like.
I place this over to the right of the siggy.
Duplicate this layer and hide it.
We'll use the hidden layer in a minute.
With the tube layer highlighted
Erase any portion of the tube
that shows below frame-01 layer.
Now unhide the last tube layer.
Place this over to the left
behind frame-01.
You may need to resize your tube to fit.
It will depend on the tube you are using
how much you will resize it.
Play around til it looks good.
Open pd-kiss-01.
Resize to 40%.
Place in upper right corner.
Open pd-heart-01.
Resize to 30%.
Place in upper right corner.
Open pd-wa-01.
Resize to 50%.
Again, place in upper right corner.
On this layer
I placed a Stroke, Outside, 3
color ea11f2.
I used no drop shadows on this taggie.
Make a new layer.
In the font of your choice,
Type the word “Me”.
I used the color fab2ef
with a Stroke, Black, Outside, 3.
Position this in upper right corner
next to pd-wa-01.
Make another new layer.
Type your name.
I used the same settings as the word “Me”.
Center on the top of frame-01.
One last thing to do:
Open pd-light-02.
Resize to 50%.
Place this behind all layers.
Duplicate it three times.
Move each of these layers
toward the outer corners on your sig.
This will soften the look of your taggie.
MOST IMPORTANT!!
You must now do this:
Put the artist's name, website, and your license number
of the tube you used on the siggy!!
Add your name (ie: Designed by Your Name) behind this info.
Make sure this info is legible and clearly seen.
Save as PSD to maintain layers.
Then save as PNG, remembering to use a number behind your sig title.
YOU'RE DONE!!
I hope you had fun with this tut!
♥HUGS!♥
*This tut was created by me, Redneck Tuts by Savage.
Any resemblance to any other is purely coincidental.*
Artist: ©verymany www.picsfordesign.com PFD_Savage
Friday, May 27, 2011

gave me this award!
WHOO HOO!
I'm so excited! My first blog award!
♥Thank you so much, Jenny♥
The aim of the award is to
bring recognition to blogs with minimal followers.
Since I have accepted the award I must pass it on to
at least 3 other blogs (but not more than 5),
that have inspired me and I feel deserve a bit more attention.
The rules are to say thank you on my blog
to the one who passed it on to me
and link to their blog (see above).
Pick the blogs to pass the award on to,
leave a note on their blog and then list them with links to their blogs...
So here are the blogs I chose:
And just one more..
A very special Thank You to the one
who started all this for me:
Rieka Rafita
Without you, Rieka,
Redneck Tuts by Savage
would not exist.
♥THANK YOU!♥
A very special Thank You to the one
who started all this for me:
Rieka Rafita
Without you, Rieka,
Redneck Tuts by Savage
would not exist.
♥THANK YOU!♥
Just click the Blog Names above to see their awesome Blogs!
Friday, May 20, 2011
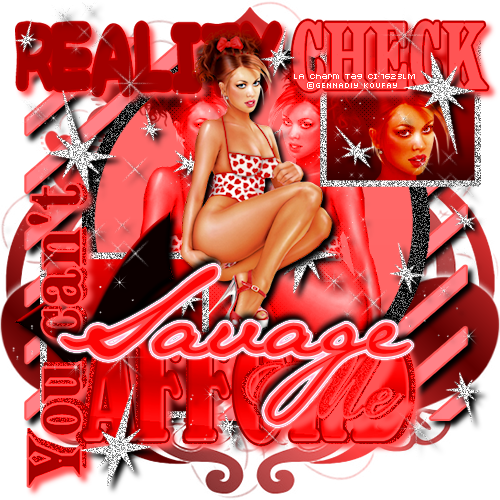
This is soooo AWESOME!
Leslie Ann made this kick ass taggie using my Reality Check template.
I LOVE LOVE LOVE IT!
♥THANK YOU FOR THIS KICKIN' TAG, LESLIE ANN!♥
If you'd like to see more from Leslie
Visit her blog LA Charms Rose.
Just click HERE.
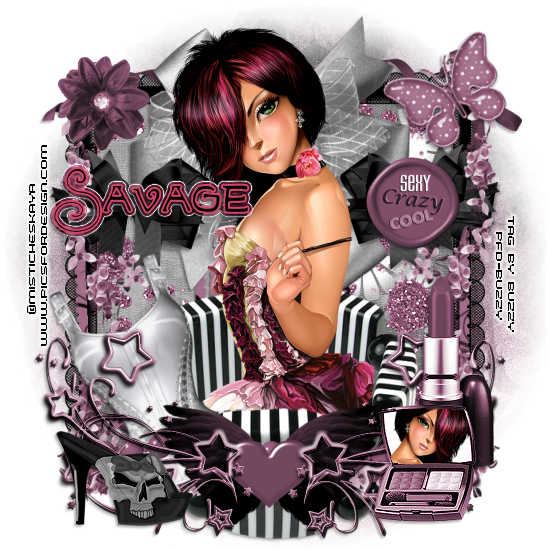
Lookie Lookie Lookie!
Another fabulous taggie from Iris!
She used my Sexy Crazy Cool tut.
I just love it!
♥THANK YOU IRIS FOR THIS AWESOME TAGGIE!♥
If you'd like to see more of her fabby tags
Visit her blog Buzzy's Hive.
Just click HERE.
Monday, May 16, 2011

SUPPLIES NEEDED
TUBE OF CHOICE: I used the fab artwork of Verymany.
You must have a license to use this art.
You can find this art and get your license HERE.
SCRAPKIT: GothyCheekyVal by Jennys Designz.
This is a FTU kit. You can find it HERE.
FONT OF CHOICE: I used ManyWeatz.
I used Photoshop for this tut.
♥♥♥♥♥♥♥
Let's have some fun!
Open a canvas, transparent background, 600x600 pixels.
Open Frame03.
Center on canvas.
Open Frame04.
Center on top of Frame03.
Put an Outer Glow on this layer.
(Doing this will help you see it as you build your tag.)
Open Fan.
Resize to 30%.
Place behind Frame03.
Use my tag as a a guide for placement.
Open Bow2.
Resize to 75%.
Place on top of Frame04.
Open Boot.
Place over to the right of the frames.
Open your tube.
Duplicate it and hide one layer for now.
Resize ONE tube layer to 50%.
Place where you like.
To make her look like she's leaning on the boot:
Duplicate the tube layer that you reduced to 50%.
Place this layer behind the boot.
Highlight the other 50% tube layer.
Erase your tube where her legs are covering up the boot.
(Don't worry about any mistakes in erasing.
That's why you have a tube layer under the boot.)
Open Barbedwire.
Place this behind your top 50% tube layer
and on top of the boot.
See that?
It looks like the barbed wire is wrapped around the tube.
Cool, huh? LOL!
Behind the boot and on top of the frames
I used these elements:
Black Lace Corset
Resize 40%.
Ruffle Ribbon
Resize to 75%.
Flower2.
Duplicate this layer and hide one layer for later.
Resize ONE layer to 10%.
Duplicate the 10% layer and resize to 80%.
You now have three flower2 layers:
One hidden at original size.
One at 10%.
And that layer duplicated and resized to 80%.
(The different sizes gives it a more unique look.)
Rose1
Resize 40%.
Butterfly2
Resize 45%, Flip Horizontally.
Open Feather(2).
Place behind boot and rotate just a little.
Open Feather.
Rotate this slighty and place on top of feather(2).
Go to the rectangle box in the upper left corner of your layer palette.
It should say Normal.
Click on the down arrow.
When a window pops up,
Click on Soft Light.
Leave Opacity at 100%.
(That's right next to the rectangle box you just clicked.)
Now duplicate your Feather layer.
Flip this Horizontally.
Move this over so it's behind the Corset.
Go back up to that rectangle box.
Click the down arrow.
Select Normal.
Set Opacity to 65%.
Ok. Remember that tube layer you hid?
We're gonna play with it now. LOL!
Unhide the tube and move it down the layer palette.
Place it under Frame03.
No need to resize.
Position her face to your liking.
Now highlight Frame03 layer.
Grab your magic wand and click inside the circle frame.
Highlight tube layer.
Go to your toolbar and click Select.
Choose Inverse and click.
Hit the Delete button on your keyboard.
Go back to Select and click Deselect.
Duplicate the tube layer you just did.
With the duplicated tube layer still highlighted:
Go to your toolbar.
Click Image.
When a drop down menu shows up,
Go to Adjustments.
Another drop down menu will appear.
Find Black & White and click it.
Now you will only see the black & white tube layer.
That's ok.
Still on this layer,
Grab an eraser.
Erase the black & white tube's hair.
Look at that!
Awesome.....LOL!
Open Sparkles.
I placed this on top of everything
except the top 50% tube layer.
Position where you like.
I placed this in the lower left corner.
Then I duplicated it,
Flipped it Horizontally
and placed it in the upper right corner.
Now go grab the Flower2 layer you hid.
Move this down behind everything.
Resize to 25%.
Move over to upper left corner.
Duplicate this layer.
I flipped this Vertically.
Move it over to upper right corner.
Now for drop shadows.
We're gonna do this the easy way.
Go to your 50% tube layer that's UNDER the boot.
Place a drop shadow.
While this layer is highlighted,
Right Click.
Select Copy Layer Style from the menu that shows up.
Go to the layer you want a drop shadow on and
Just highlight the layer and Right Click.
Select Paste Layer Style
then do go on to the next layer.
Easy Peasy...
Put your drop shadow on these layers:
Barbedwire
Boot
Flower2 (all these layers)
Ruffle Ribbon
Bow2
Fan
Some of the layers blend in together because they are so dark.
To make them stand out,
I placed an Outer Glow and Drop Shadow on them.
Once you apply these effects to one layer,
You can Right Click
Copy Layer Style
and then Paste Layer Style on the other layers.
These are the layers I did this too:
Butterfly2
Rose 1
Black Lace Corset
Frame03
Make a new layer on top of all layers.
Type the name you want in the font you want.
I used Black, Stroke, 3, Outside, feb4e8.
MOST IMPORTANT!!
You must now do this:
Put the artist's name, website, and your license number
of the tube you used on the siggy!!
Add your name (ie: Designed by Your Name) behind this info.
Make sure this info is legible and clearly seen.
Save as PSD to maintain layers.
Then save as PNG, remembering to use a number behind your sig title.
YOU'RE DONE!!
I hope you had fun with this tut!
HUGS!
*This tut was created by me, Redneck Tuts by Savage.
Any resemblance to any other is purely coincidental.*
Artist: ©verymany www.picsfordesign.com PFD_Savage
Subscribe to:
Posts
(Atom)
About Me

- Savage
- Hi Ya'll! I'm Savage and I'd like to welcome you to Redneck Tuts. These are not your ordinary tuts, as they are geared toward those of us that don't have "working knowledge" of Photoshop or PSP. My tuts are all done in PS. They are designed to show you different techniques that you may not know. I hope you learn something that you can use in your creations in the future. Please, just have fun and put your own spin on these tuts. Be original and shine! Love Ya! ♥


